The Omnichannel Conversations module is a centralized hub for managing all user interactions across various channels. It provides agents with the tools to view, assign, respond to, and report on conversations, ensuring a seamless and efficient support and engagement experience.
Getting started
Accessing the module
Sign in to your TIDWIT ecosystem instance. In the upper-left corner, click the Menu button. The left-hand side panel will display icons corresponding to the different apps and workloads available on TIDWIT. The first three icons correspond to the Users section, which is explained in the User Manual. The remaining icons are only visible with an administrator profile. If you can’t see them and you are an administrator, ask your TIDWIT portal administrator to grant you the required permissions.
Omnichannel Conversations main page
Omnichannel Conversations allows administrators and support agents to manage all user interactions within the platform. Through this interface, users can view, filter, and manage conversations handled by AI, manual agents, or moderated modes.
To open the main page, place the mouse pointer over the Omnichannel Conversations icon, then click the Manage Conversations option; you will be redirected immediately. The first thing you will see is a list of all unassigned conversations created to date, along with some of their properties.
When you access the module, the primary navigation menu on the left provides access to four core areas:
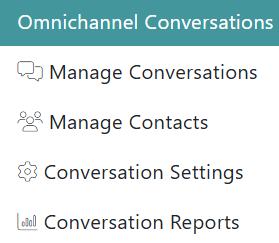
- Manage Conversations: Main panel to access and manage all active and queued conversations.
- Manage Contacts: Overview and manage the contact information of the users who interact through the omnichannel.
- Conversation Settings: Allows administrators to manage the customer engagement hub integrations, channels, custom fields, and more.
- Conversation Reports: Provides analytics and reports on conversation metrics and agent performance.
Manage Conversations
The Manage Conversations panel is the main area where agents and supervisors access, filter, and handle all active and queued conversations.
Filters
The Filters panel allows agents and supervisors to quickly narrow down conversations based on status, time period, channel, priority, and assignment. Using filters helps you focus on the most relevant conversations and manage workloads efficiently.
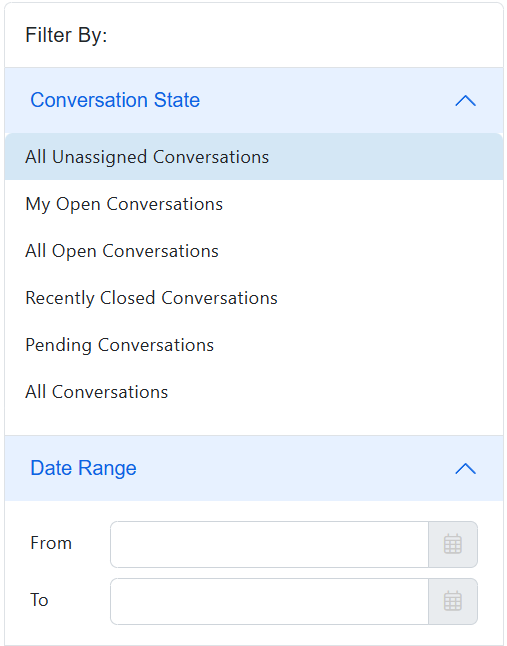
Conversation State
Use this filter to view conversations based on their current lifecycle status:
- All Unassigned Conversations: Displays conversations that have not yet been assigned to any agent.
- My Open Conversations: Shows open conversations currently assigned to you.
- All Open Conversations: Lists all open conversations, regardless of assignee.
- Recently Closed Conversations: Displays conversations that were closed recently.
- Pending Conversations: Shows conversations waiting for an action or response.
- All Conversations: Displays the full conversation history, without state restrictions.
Click a state to apply the filter. Only one conversation state can be selected at a time.
Date Range
Filter conversations by a specific time period.
- From: Select the start date of the range.
- To: Select the end date of the range.
Use the calendar icons to choose dates. The results will include conversations created or updated within the selected range.
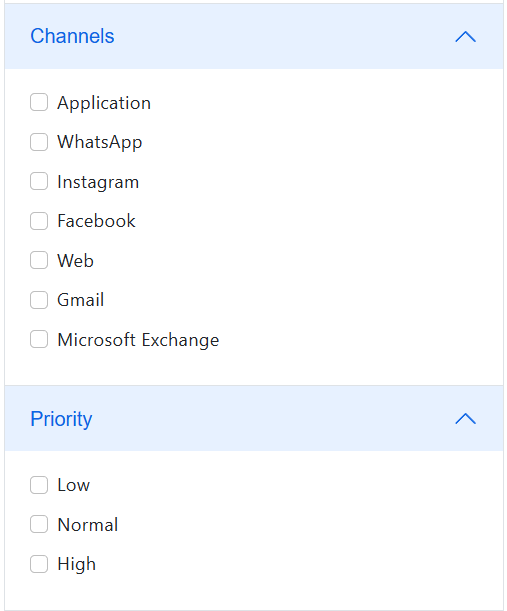
Channels
Filter conversations by the communication channel used by the customer:
- de aprendizaje
- Web
- Gmail
- Microsoft Exchange
You can select one or multiple channels at the same time.
Priority
Use this filter to focus on conversations based on urgency:
- Low: Non-urgent conversations.
- Normal: Standard priority conversations.
- High: Urgent or critical conversations that require immediate attention.
Multiple priority levels can be selected simultaneously.
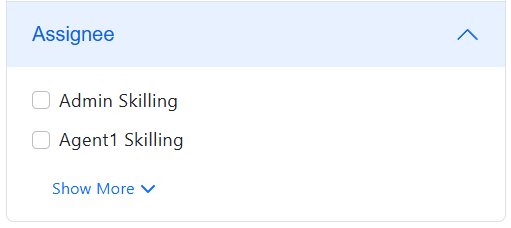
Assignee
Filter conversations by the user or role responsible for handling them:
- Admin Skilling
- Agent1 Skilling
- Agent2 Skilling
- Supervisor Skilling
Select one or more assignees to view only the conversations assigned to them. Use Show Less / Show More to collapse or expand the list.
Using multiple filters
You can combine filters across sections (for example, Open Conversations + WhatsApp + High Priority) to refine results even further. All selected filters are applied simultaneously. To update the results, simply change or clear any filter option; the conversation list refreshes automatically based on your selection.
Users can also initiate a new outbound conversation by clicking the Initiate Conversation button. Through each conversation, users can:
- Review the full message history between the agent (AI or human) and the user.
- Assign an agent, change conversation mode (AI, Manual, or Moderated), and adjust priority.
- Edit the conversation title, delete the conversation, or undock it for separate viewing.
- Use the submission options (Submit as New, Open, Pending, or Closed) to update the conversation’s status.
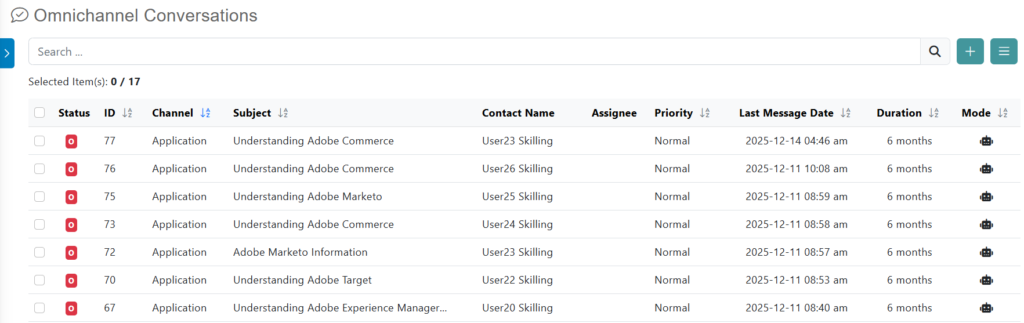
Conversation table
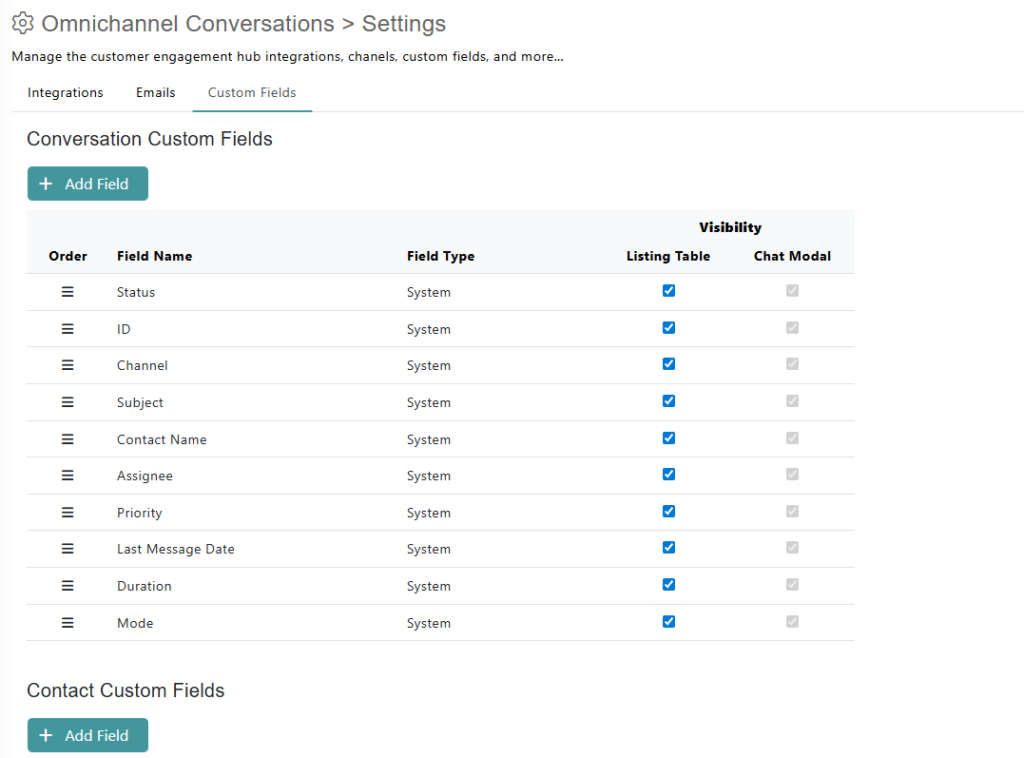
After selecting a filter, the dashboard displays a list of relevant conversations, organized into sortable columns. The columns provide the following information:

- ID: The unique identification number for the conversation.
- Channel: The source of the conversation (e.g., Application, Web Chat).
- Subject: The title or topic of the conversation.
- Contact Name: The name of the user who initiated the conversation.
- Assignee: The agent currently assigned to the conversation.
- Priority: Relevance level in relation to the topic of the conversation (Low, Normal, High).
- Last Message Date: The date and time of the most recent message.
- Duration: The total time the conversation has been open.
- Mode: The handling mode, such as AI-assisted, moderated, or manual.
Conversation Interface
The Conversation Interface is the main workspace where agents and supervisors view, manage, and respond to individual conversations across all channels. This interface centralizes conversation details, settings, messages, and response actions in a single view.
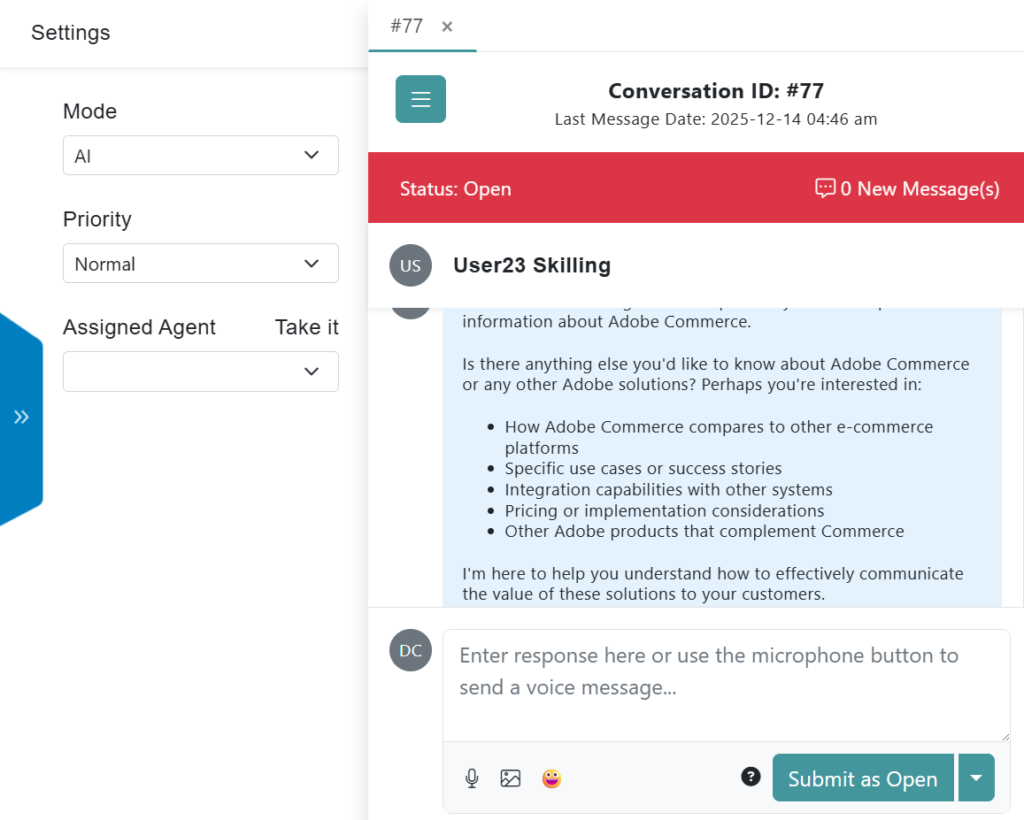
Conversation Header
At the top of the interface, key conversation metadata is displayed:
- Conversation ID: A unique identifier for the conversation (for example, #32).
- Last Message Date: Shows the date and time of the most recent message received in the conversation.
- Close Panel Icon (X): Allows you to close the current conversation view.
Conversation Status Bar
Below the header, the status bar provides real-time information about the conversation:
- Status: Indicates the current state of the conversation (for example, Abrir).
- New Messages Indicator: Displays the number of unread or new messages in the conversation.
The status bar helps agents quickly understand whether action is required.
Settings Panel
The Settings panel on the left side allows you to manage conversation-level configurations:
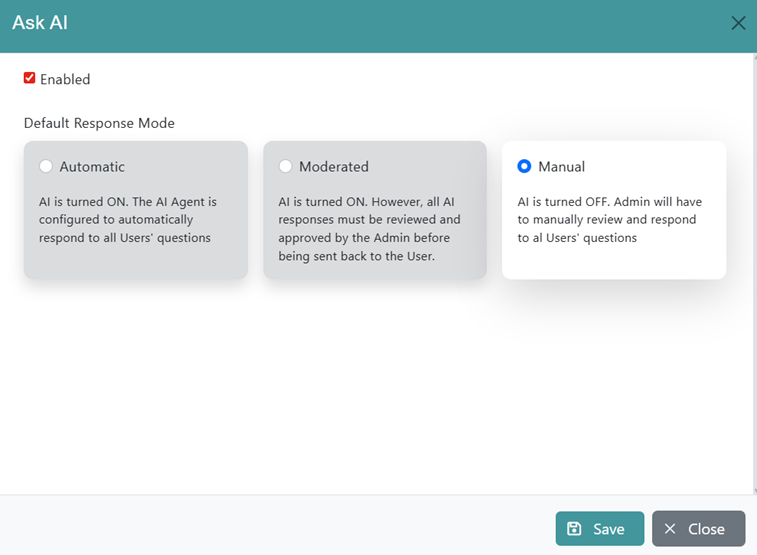
- Mode: Defines how the conversation is handled. Provides options to switch the conversation’s handling mode between AI Mode, Moderated Mode, and Manual Mode.
- Priority: Sets the urgency level of the conversation (Low, Normal, or High).
- Assigned Agent: Assigns the conversation to a specific user or role. Options may include Admin Skilling, Agent Skilling, or Supervisor Skilling.
Changes made in the Settings panel are applied immediately.
Conversation Content Area
The central area displays the full message history:
- Messages are shown in chronological order.
- AI-generated responses may include structured content such as headings and bullet points.
- The scroll bar allows navigation through longer conversations.
This area provides full context for informed and consistent responses.
Answer Center
At the bottom of the interface, the response field is used to send replies:
- Text Input Field: Enter your written response.
- Microphone Icon: Record and send a voice message (if enabled).
- Attachment Icon: Attach files or images to your message.
- Emoji Icon: Add emojis to your response.
- Submit Button: Sends the message and keeps the conversation Abrir (by default).
- Submit Options: Allow alternative submission actions depending on workflow configuration; you can submit as New, Pendiente, or Closed.
Workflow notes
- Responses are logged in real time and immediately visible to all assigned users.
- The interface supports seamless collaboration between human agents and AI assistants.
- Conversation status and priority can be adjusted at any point during the interaction.
The Conversation Interface is designed to maximize efficiency, clarity, and control while managing omnichannel customer interactions.
Minimize open conversations panel
La columna Minimize Panel button (double-arrow icon) allows you to collapse the list of open conversations on the right side of the interface. When this button is used:
- The open conversations panel is minimized.
- The conversation interface becomes wider, allowing better visibility of all conversations.
- The panel can be expanded again at any time by clicking the same button.
The minimize function helps agents stay focused on the active conversation while maintaining quick access to the conversation list when needed.
Conversation Actions Menu
Additional actions are available in a menu at the top-right of the conversation view.
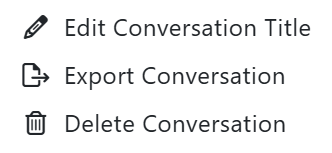
- Edit Conversation Title: Allows the agent to change the subject of the conversation for clarity.
- Delete Conversation: Permanently removes the conversation.
- Undock: Opens the conversation view in a separate tab for easier multitasking.
Manage Contacts
The Contacts module within Omnichannel Conversations provides a centralized view of all customers who have interacted with your organization across supported channels. This module allows agents and supervisors to search, filter, and review customer activity and quickly access related conversations.
Header
The header includes:
- Search Bar: Allows you to search contacts by name, email, or other identifying information.
- Filter Icon: Opens additional filtering options to refine the contact list, allowing you to filter the table information by Last Message Date.
Quick Filters
Below the search bar, quick filter tabs allow you to segment contacts based on their request status:
- All Customers: Displays all contacts with at least one conversation.
- Customers With New Requests: Shows contacts with newly created conversations that have not yet been handled.
- Customers With Open Requests: Displays contacts who currently have active, open conversations.
- Customers With Pending Requests: Shows contacts with conversations waiting for follow-up or resolution.
Clicking a tab instantly updates the contact list.
Contacts Table
The main area displays a table with detailed contact information:
- Contact #: Unique identifier assigned to each contact.
- Contact Name: Name of the customer or user.
- Correo electrónico: Primary email address associated with the contact.
- Mobile #: Phone number or unique mobile identifier linked to the contact.
- # Conversations: Total number of conversations associated with the contact.
- Last Message Date: Date and time of the most recent message exchanged with the contact.
Each column header can be used to sort the list in ascending or descending order.
Contact Row Actions
Each contact row includes an arrow icon on the right side:
- Open Contact Details: Click the arrow to access the full conversation history and details related to the selected contact.
This allows agents to quickly move from a high-level view to active conversation handling.
Conversation Actions Menu (Three Dots)
Each conversation includes an Actions menu accessible through the three-dot icon. This menu provides quick actions to manage the conversation without leaving the interface:
- Edit Conversation Title: Update the conversation title to make it easier to identify and track. Useful for categorizing conversations by topic, issue, or customer request.
- Toggle to AI Mode: Switches the conversation to AI-driven handling, allowing the configured AI agent to respond automatically based on its training and context.
- Toggle to Moderated Mode: Enables a hybrid mode where AI-generated responses can be reviewed, adjusted, or approved by a human agent before being sent.
- Toggle to Manual Mode: Assigns full control of the conversation to a human agent. In this mode, all responses are written and sent manually, without AI intervention.
- Go to Conversation: Redirects you to the full conversation view, ensuring direct access to the complete message history and interaction controls.
These actions provide flexibility in how each conversation is managed, allowing teams to switch modes dynamically based on complexity, priority, or customer needs. The Contacts module helps teams maintain visibility, organization, and continuity across all omnichannel customer interactions.
Conversation Settings
The Settings section within Omnichannel Conversations allows administrators to configure how customer interactions are handled across channels, manage AI agents, and control integrations that power the customer engagement hub. This section is typically used by administrators or supervisors with configuration permissions.
At the top of the page, the following tabs are available:
- Integrations: Manage agents and communication channels connected to Omnichannel Conversations.
- Emails: Configure email-related settings for customer communications.
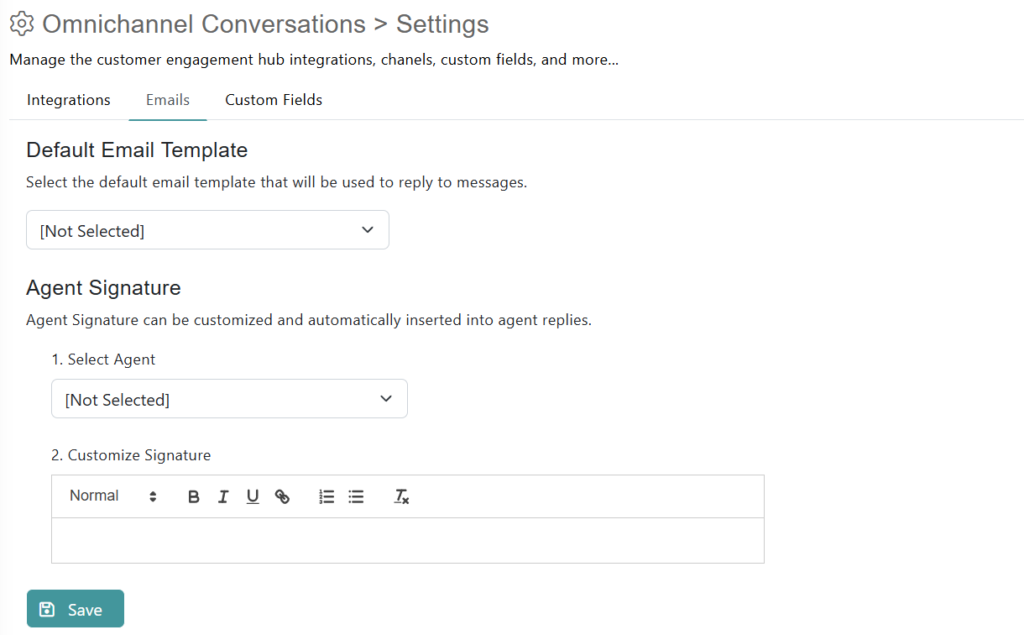
- Custom Fields: Define and manage custom data fields associated with contacts or conversations.
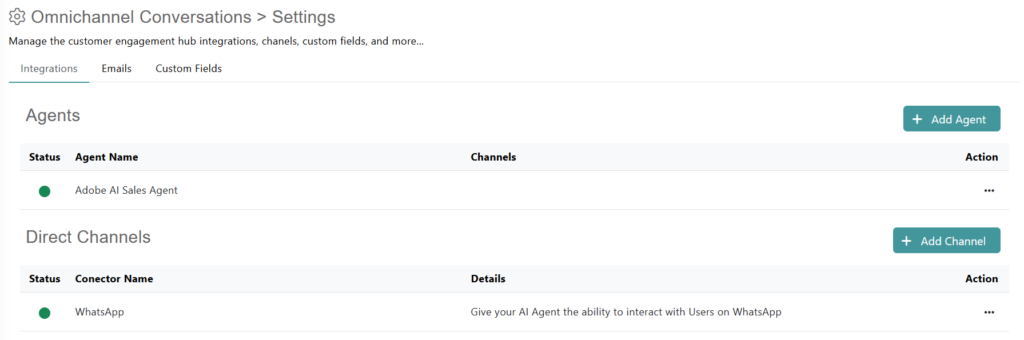
Agents
The Agents section displays the list of AI agents available for Omnichannel Conversations. For each agent, the following information is shown:
- Status: Indicates whether the agent is active (green indicator) or inactive.
- Agent Name: The name assigned to the AI agent.
- Channels: Displays the channels associated with the agent (if applicable).
- Action Menu (Three Dots) – Remove: Removes the agent from Omnichannel Conversations.
Add Agent
La columna Add Agent button allows you to add a new AI agent to the Omnichannel Conversations module. This enables organizations to deploy specialized agents for different use cases, such as sales, support, or onboarding.
Direct Channels
The Direct Channels section allows you to connect and manage communication channels through which customers interact with your AI agents or support teams. For each connector, the following details are displayed:
- Status: Indicates whether the connector is active.
- Connector Name: The name of the communication channel or integration.
- Details: A brief description of what the connector enables.
- Action Menu (Three Dots): Configure Connector opens the configuration settings for the selected channel; Remove Connector disconnects the channel from Omnichannel Conversations.
Examples of available direct channels include:
- Ask AI Chat Bot (Node-Level): Allows users to interact with the AI agent through the “Ask AI” chat modal available from the top bar and selected libraries.
- WhatsApp: Enables customer interactions with AI agents or support teams through WhatsApp.
Add Channel
La columna Add Channel button allows you to connect a new communication channel to Omnichannel Conversations.
Use cases and best practices
- Assign different AI agents to handle specific channels or business functions.
- Enable or disable channels based on operational needs.
- Regularly review agent and connector status to ensure uninterrupted customer communication.
The Settings module provides centralized control over agents and channels, ensuring a scalable and well-governed omnichannel customer engagement experience.
Conversation Reports
The Conversation Reports dashboard provides a comprehensive analytical overview of the Omnichannel Conversations module. It allows administrators and managers to visualize key metrics, track agent and AI performance, and identify trends in conversation volume and efficiency over time.
Date Range Filtering
To analyze a specific period, use the date filters at the top of the page.

- Select a predefined range, such as “Year To Date,” from the first dropdown menu.
- Alternatively, specify a custom start and end date in the text field.
- Click the Go button to apply the selected date range and refresh the report data.
Content Filtering
You can further customize the report data using the Filters section.

- All Channels: Filter the data to show conversations from one or more specific channels (Application, WhatsApp, Instagram, Web).
- All User Agents: Isolate data related to specific agents.
- All Priorities: View data for conversations that match selected priority levels (Low, Normal, High).
Report Sections
The dashboard has different sections that summarize statistical data from conversations.
AI vs Human Engagement
This section compares the volume of responses submitted by AI versus human agents.
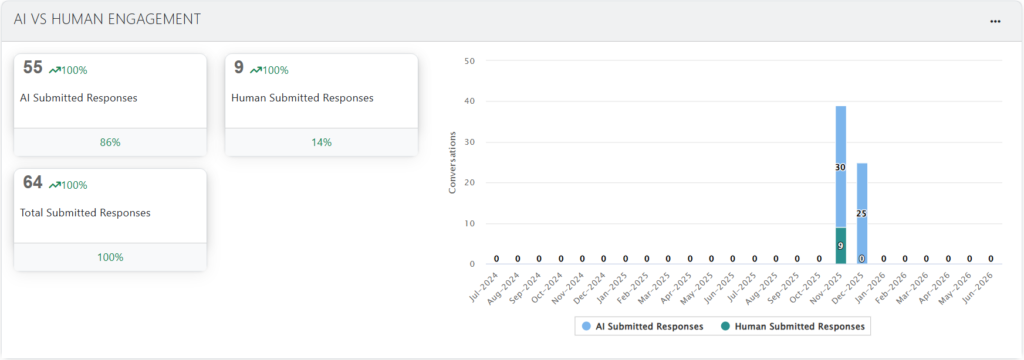
- KPI Cards: Display total counts for AI Submitted Responses, Human Submitted Responses, and Total Submitted Responses. Each card also shows its percentage relative to the total.
- Bar Chart: Provides a monthly breakdown of AI-submitted responses versus human-submitted responses.
Tickets by Date
This widget tracks the number of conversations (tickets) created and solved over time.
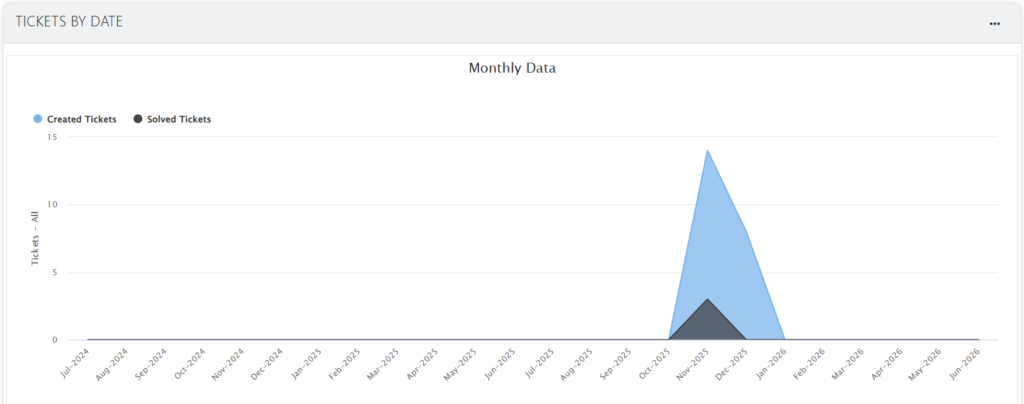
- Monthly Data: An area chart shows the total number of Created Tickets versus Solved Tickets for each month within the selected date range.
- Channel Breakdown: Separate area charts display the monthly ticket volume for individual channels, such as Application, WhatsApp, Instagram, and Web.
Tickets by Agent and by Status
This section provides a snapshot of the current ticket distribution.
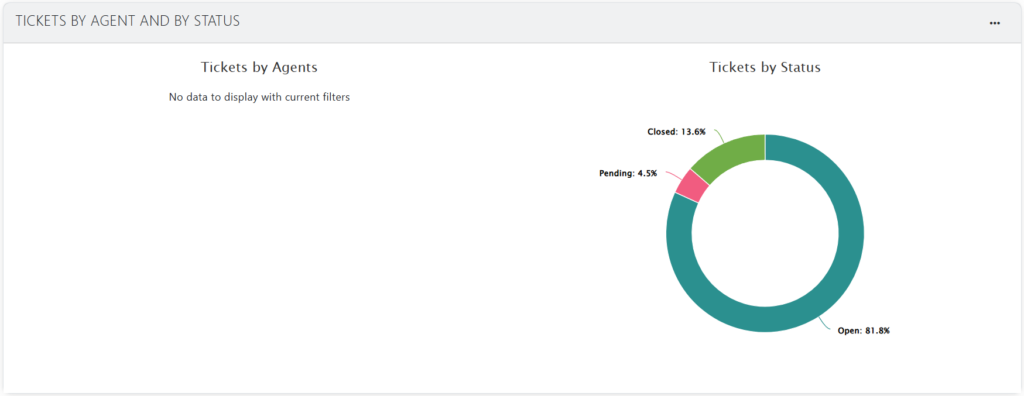
- Tickets by Agents: A donut chart illustrates the percentage of tickets assigned to agents versus those that are Unassigned.
- Tickets by Status: A donut chart shows the proportion of tickets in each status.
Tickets by Day & Hour
These charts identify peak times for ticket creation.
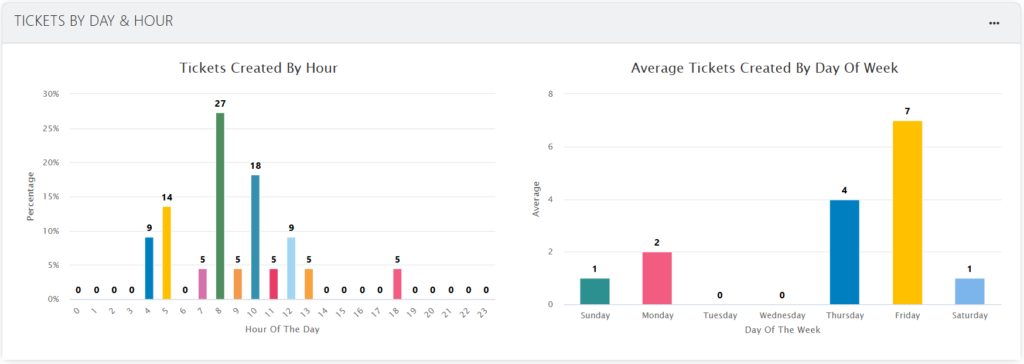
- Tickets Created By Hour: A bar chart displays the percentage of tickets created during each hour of the day.
- Average Tickets Created By Day Of Week: A bar chart shows the average number of tickets created on each day of the week.
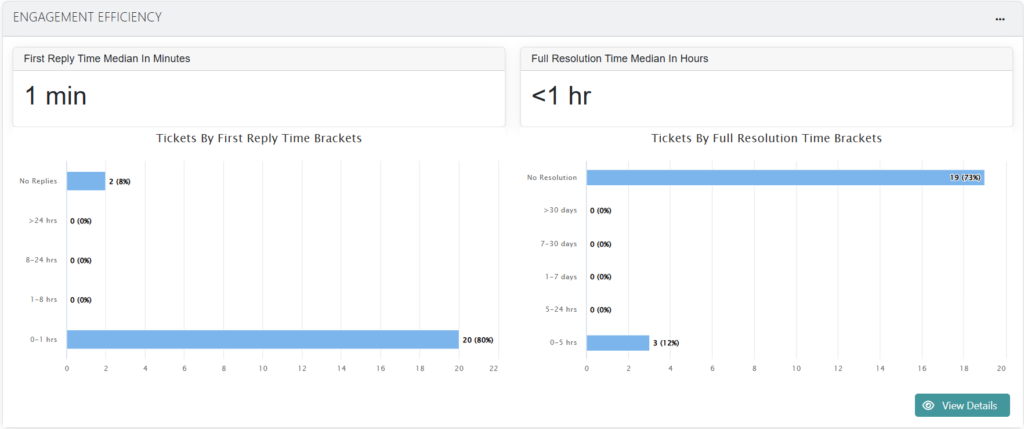
Engagement Efficiency
This widget measures the speed and effectiveness of responses and resolutions.
- Median Times: KPI cards show the First Reply Time Median in Minutes (e.g., <1 min) and the Full Resolution Time Median in Hours.
- Time Brackets: Bar charts provide a percentage breakdown of tickets based on how long they took to receive a first reply (e.g., 0–1 hrs) and to reach full resolution.
A Ver Detalles button is available to get a more detailed view of the efficiency data.