
Administrator Manual — TIDWIT Platform
1. Introduction
Omnichannel Connect is the customer engagement hub of the TIDWIT platform. It centralizes every conversation between your users and your AI agents (or human agents) across multiple channels — Application, WhatsApp, Instagram, Facebook, Web, Gmail and Microsoft Exchange — and provides the tools needed to triage, moderate, and analyze them from a single workspace.
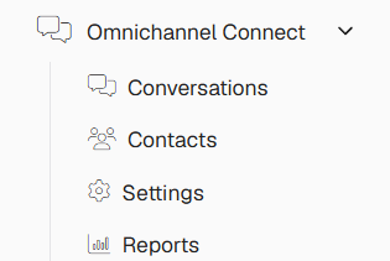
The module is organized in four submodules, accessible from the left-hand side menu under the Omnichannel Connect entry:
- Conversations — central inbox where every conversation can be reviewed, filtered, assigned and answered.
- Contacts — directory of every user who has interacted with the agents, with their conversation history.
- Settings — configuration area for agent integrations, channels, default emails and custom fields.
- Reports — analytics dashboards that measure AI vs human engagement, agent productivity, ticket distribution and response times.
2. Conversations
The Conversations submodule is the inbox of Omnichannel Connect. It lists every conversation handled by the agents of the node and lets administrators search, filter, open and act on each one of them.
2.1 Main Page
Click on Conversations in the Omnichannel Connect menu to open the main listing. The page provides a search bar, a Filters button and a counter that shows how many items are currently selected out of the total visible records.
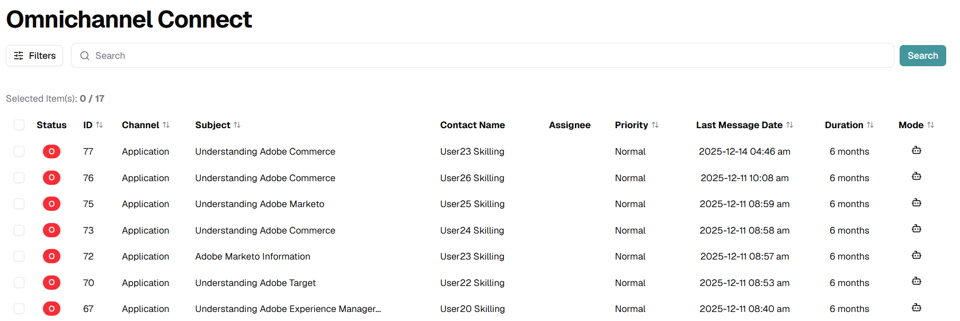
The table includes the following columns by default:
- Status — current state of the conversation (for example, Open). The colored indicator reflects the status code.
- ID — unique identifier of the conversation, used to locate it in reports and external tools.
- Channel — channel where the conversation took place (Application, WhatsApp, Instagram, etc.).
- Subject — topic or first message that summarizes the conversation.
- Contact Name — user who started the conversation.
- Assignee — agent currently responsible for the conversation. Empty when the conversation is unassigned.
- Priority — Low, Normal or High.
- Last Message Date — timestamp of the most recent message exchanged.
- Duration — time elapsed since the conversation was opened.
- Mode — indicates whether the conversation is being handled in AI, Moderated or Manual mode. The icon reflects the current mode.
Every column header includes a sort icon to reorder the table by that attribute.
2.2 Filters
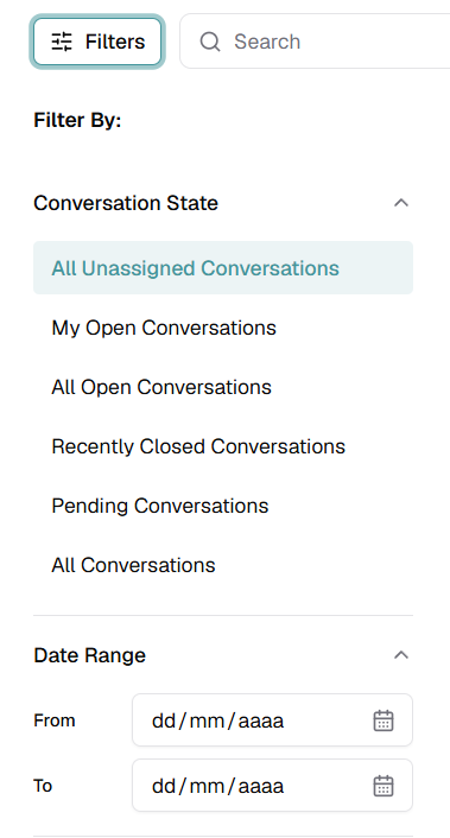
Click the Filters button on the upper-left corner of the page to open the filter panel. The panel is organized in several sections that can be combined to narrow down the list. Use the Clear button at the bottom to reset every selection.
Conversation State
Restricts the list to a logical state of the conversation. Only one option can be selected at a time:
- All Unassigned Conversations — conversations that do not have an agent assigned yet.
- My Open Conversations — open conversations currently assigned to the logged-in user.
- All Open Conversations — every conversation in Open status, regardless of the assignee.
- Recently Closed Conversations — conversations recently moved to the Closed status.
- Pending Conversations — conversations waiting for additional input.
- All Conversations — no state restriction; shows everything.
Date Range
Use the From and To calendar pickers to limit the list to conversations whose last message falls within the selected window.
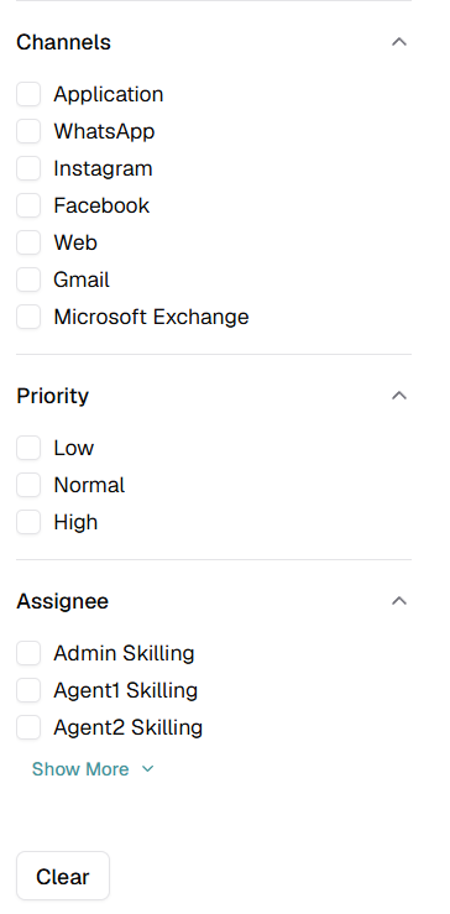
Channels
Multi-select checkboxes that restrict the list to one or more channels. Available options: Application, WhatsApp, Instagram, Facebook, Web, Gmail and Microsoft Exchange.
Priority
Multi-select checkboxes for Low, Normal and High priority. Combine them to view, for example, every High-priority conversation across all channels.
Assignee
Multi-select list of the agents that can be assigned to conversations. Use the Show More link to expand the full agent list when many agents are configured on the node.
2.3 Open Conversation View
Click any row in the conversations table to open the full conversation view. The view is divided in two areas:
- Settings (left panel) — lets you change the operating Mode (AI, Moderated, Manual), the Priority (Low, Normal, High) and the Assigned Agent of the conversation. The Take it link assigns the conversation to the logged-in user with a single click.
- Conversation thread (right panel) — shows the conversation header (ID, Last Message Date, Status, message counter), the message history between the user and the agent, and the response area at the bottom.
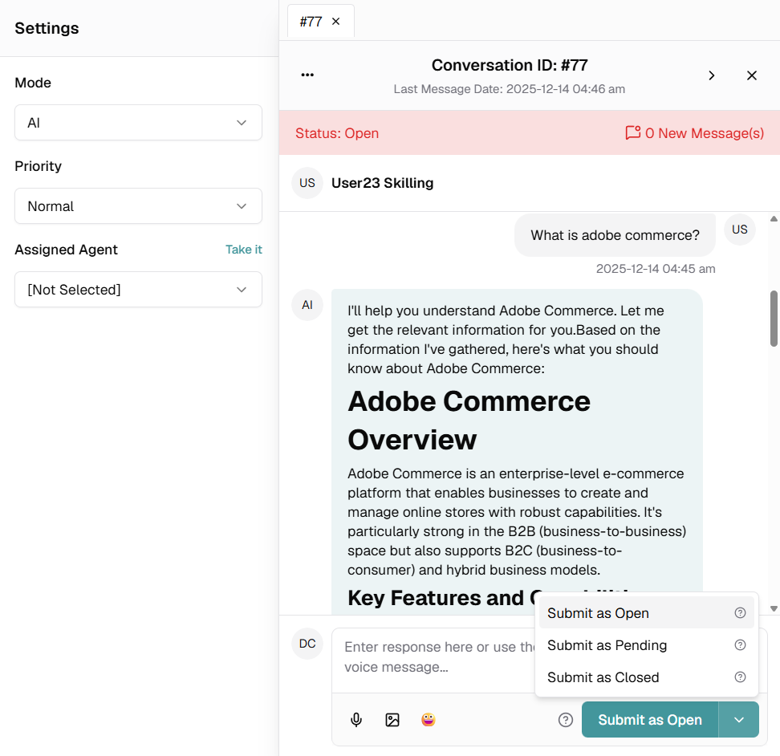
The response area at the bottom of the thread accepts text, voice notes (microphone icon), images and emojis. To submit the response, use the Submit button on the bottom-right corner. The arrow next to the button opens a dropdown with three submission modes:
- Submit as Open — sends the response and keeps the conversation in Open status.
- Submit as Pending — sends the response and moves the conversation to Pending status, indicating that additional input is expected.
- Submit as Closed — sends the response and closes the conversation.
2.4 Conversation Actions Menu
The three-dots icon at the top of the conversation header opens a contextual menu with administrative actions for the entire conversation:
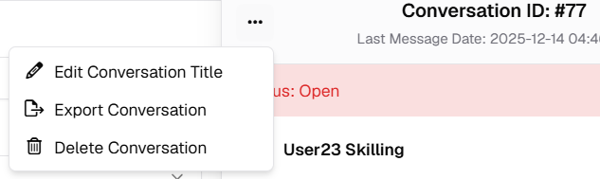
- Edit Conversation Title — lets you rename the conversation to make it easier to identify in the listing and in the reports.
- Export Conversation — downloads the full conversation thread (messages, timestamps, sender) for archival or external analysis.
- Delete Conversation — permanently removes the conversation from the node. The action requires confirmation and cannot be undone.
3. Contacts
The Contacts submodule is the directory of every user who has interacted with the agents of the node. From there administrators can browse contact profiles, review their conversation history and manage their records.
3.1 Main Page
Click on Contacts in the Omnichannel Connect menu to open the directory. The page shares the same toolbar pattern as the Conversations module: Filters, search bar and Search button.
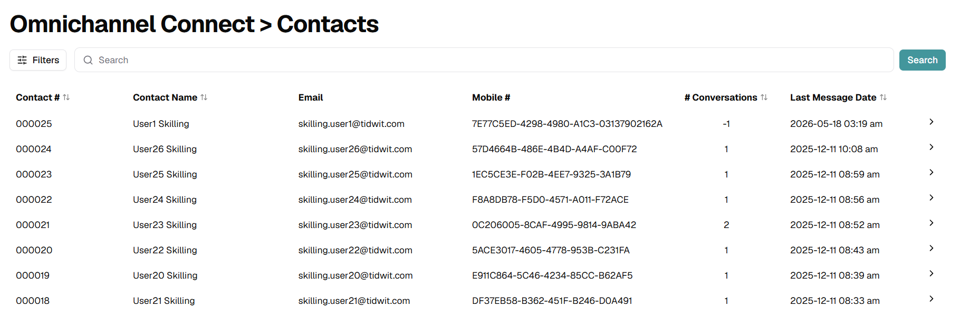
The table provides the following columns:
- Contact # — sequential internal identifier of the contact.
- Contact Name — display name of the user.
- Email — email address associated with the contact.
- Mobile # — mobile number or external channel identifier (for example, the channel-specific user UUID).
- # Conversations — total number of conversations the contact has had with the agents of the node.
- Last Message Date — timestamp of the most recent interaction.
Click the chevron icon on the right of any row to expand the contact profile.
3.2 Contact Profile (Expanded Row)
The expanded row shows the contact card with avatar, name, email and external identifier, followed by three quick statistics: # Conversations, First Conversation and Last Conversation. Below them, a nested table lists every conversation that the contact has had:
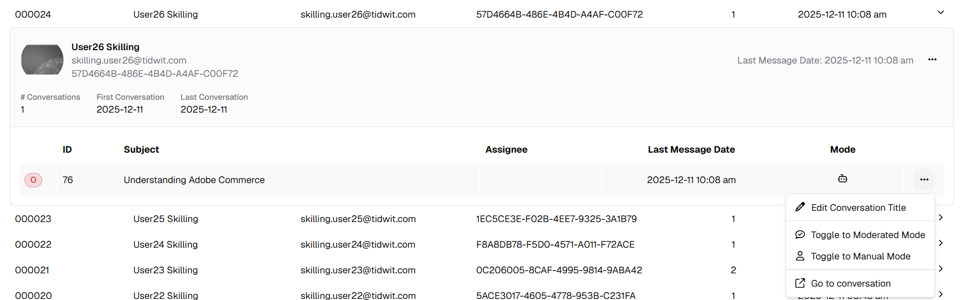
The conversation row inside the contact profile exposes a three-dots menu with administrative actions for that specific conversation:
- Edit Conversation Title — renames the conversation.
- Toggle to Moderated Mode — switches the conversation to Moderated mode: AI responses must be reviewed and approved by an administrator before being delivered.
- Toggle to Manual Mode — disables the AI agent and lets the administrator take full control of the conversation.
- Go to conversation — navigates to the full conversation view (same as clicking the row in the Conversations module).
3.3 Contact Actions Menu
The three-dots icon on the contact card header opens the contact-level actions menu:

- Delete Contact — permanently removes the contact and every associated conversation from the node. Use with caution: the action cannot be undone.
3.4 Filters
Click the Filters button to narrow down the list of contacts:
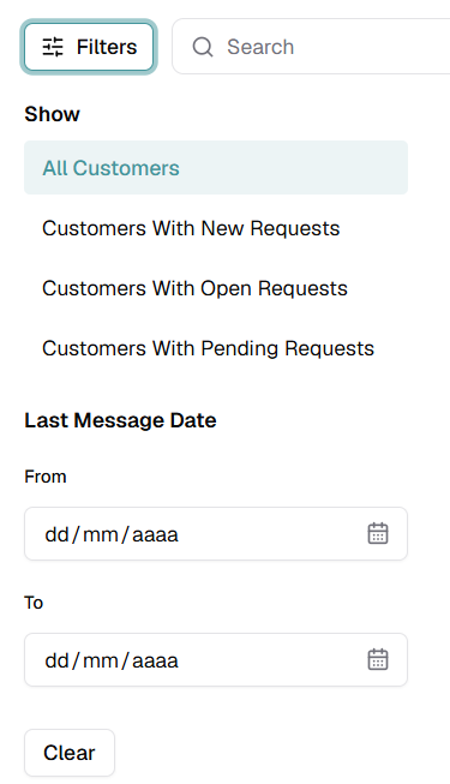
Show
- All Customers — every contact registered on the node.
- Customers With New Requests — contacts that have opened a new request not yet attended.
- Customers With Open Requests — contacts with at least one conversation in Open status.
- Customers With Pending Requests — contacts with at least one conversation in Pending status.
Last Message Date
Restrict the list to contacts whose last message falls inside the From / To date range.
4. Settings
The Settings submodule is the configuration area of Omnichannel Connect. It is where administrators connect the AI agents, configure communication channels, define default email templates and customize the data captured for every conversation and contact. The page is organized in three tabs: Integrations, Emails and Custom Fields.
4.1 Integrations Tab
Manages the AI agents and the communication channels that feed Omnichannel Connect. The tab is split in two sections:
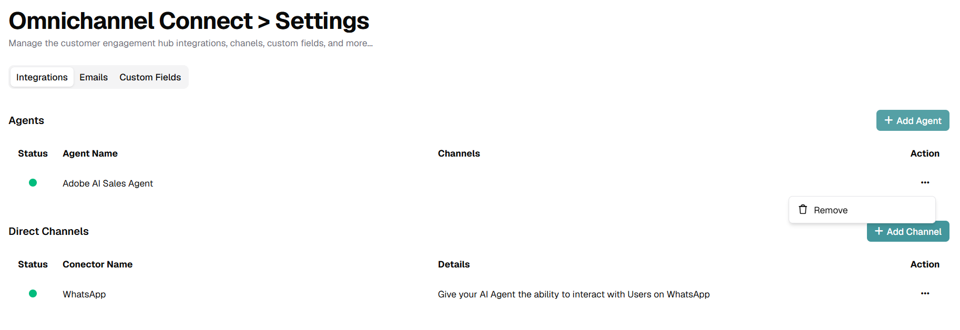
Agents
Lists every AI agent that has been connected to Omnichannel Connect. Each row shows the agent Status (green dot for active), the Agent Name, the Channels in which it operates and an actions menu. Use the + Add Agent button on the right to connect an additional agent; use the Remove option from the three-dots menu to disconnect one.
Direct Channels
Lists the communication channels enabled at node level for direct interaction with users (independently from the AI agents). Each row shows the channel Status, the Connector Name (for example, WhatsApp), the Details and the actions menu. Use + Add Channel to enable a new channel.
4.2 Emails Tab
Defines the default email behavior used to reply to messages received from email-based channels (Gmail, Microsoft Exchange, etc.).
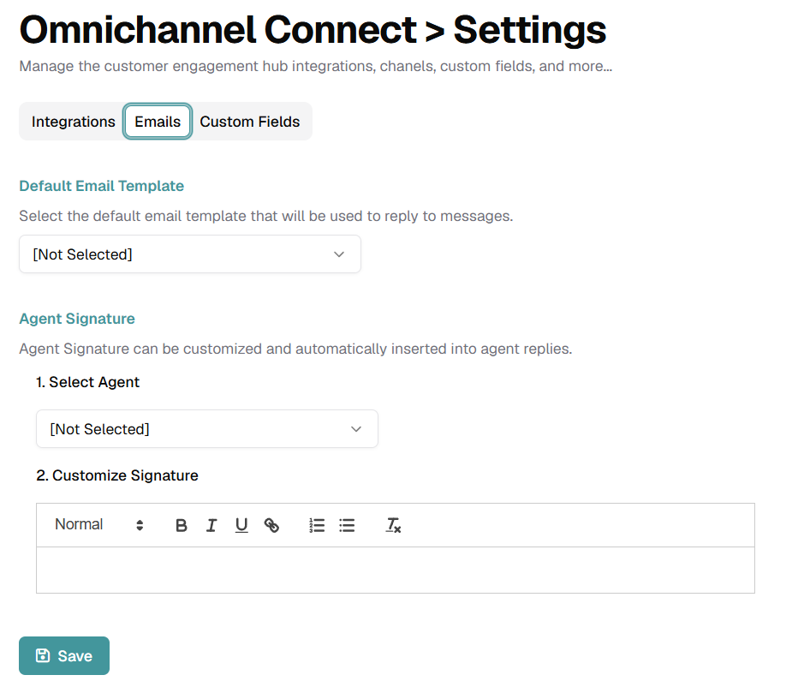
Default Email Template
Dropdown that selects the email template that will be used by default to reply to incoming messages. Templates are created from the node’s template library; the default value is [Not Selected], which forces administrators to choose a template before replying.
Agent Signature
Allows administrators to customize a signature that will be automatically appended to the replies of each agent. The configuration follows two steps:
- Select Agent — dropdown that picks the agent whose signature you want to edit.
- Customize Signature — rich-text editor with basic formatting tools (paragraph styles, bold, italic, underline, links, ordered and unordered lists, clear formatting) to compose the signature block.
Click Save at the bottom of the page to persist the changes.
4.3 Custom Fields Tab
Extends the data model of Omnichannel Connect with additional fields specific to your business. The tab manages two independent groups of fields: Conversation Custom Fields and Contact Custom Fields.
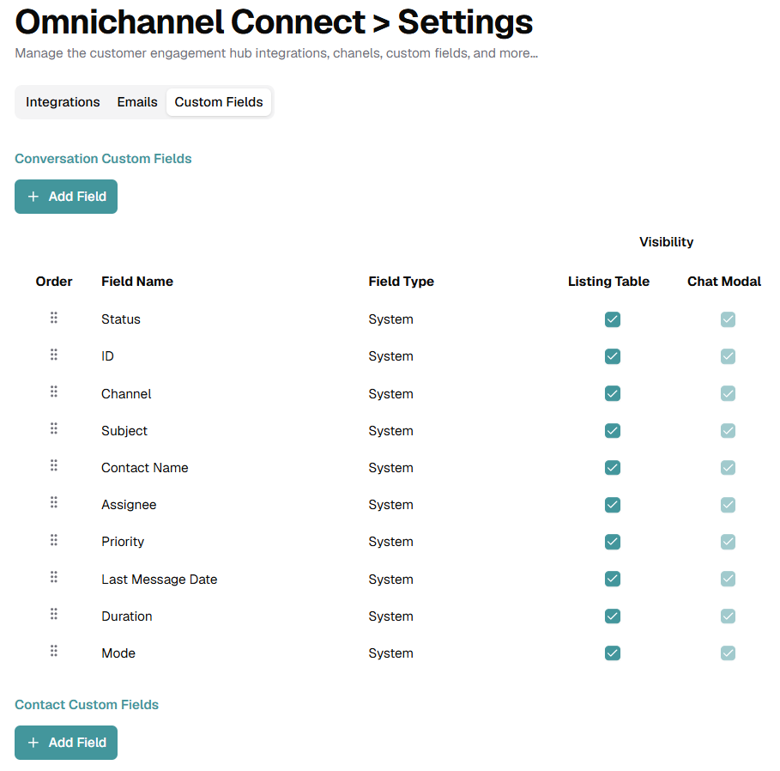
Both groups share the same table layout, with the following columns:
- Order — drag handle that lets you reorder the fields by drag-and-drop. The order defined here controls how the fields are displayed in the listings and in the chat modal.
- Field Name — internal name of the field.
- Field Type — either System (fields that come built-in with the platform, such as Status, ID, Channel, Subject, Contact Name, etc.) or Custom (fields created by the administrator).
- Visibility — Listing Table — controls whether the field is shown as a column in the main listing.
- Visibility — Chat Modal — controls whether the field is shown inside the conversation view.
Click + Add Field on the right side of each group to create a new custom field. System fields cannot be deleted, but their visibility can be toggled on or off.
5. Reports
The Reports submodule consolidates the analytics of Omnichannel Connect into the Omnichannel Conversation Reports dashboard. The header shows the last refresh date of the data and exposes the global filters that apply to every section of the dashboard.
5.1 Dashboard Header and Filters
At the top of the dashboard you will find:
- Last Refresh Date — timestamp of the last data refresh.
- Date selector — predefined ranges (such as All Time) or a custom range defined with the From / To pickers. Click Go! to apply the range.
- Channel filter — narrows the data to a specific channel or to All Channels.
- User Agents filter — narrows the data to a specific human agent or to All User Agents.
- Priority filter — narrows the data by Low, Normal or High priority.
5.2 AI vs Human Engagement
First report of the dashboard. It compares the volume of responses submitted by AI agents against those submitted by human agents over the selected period.
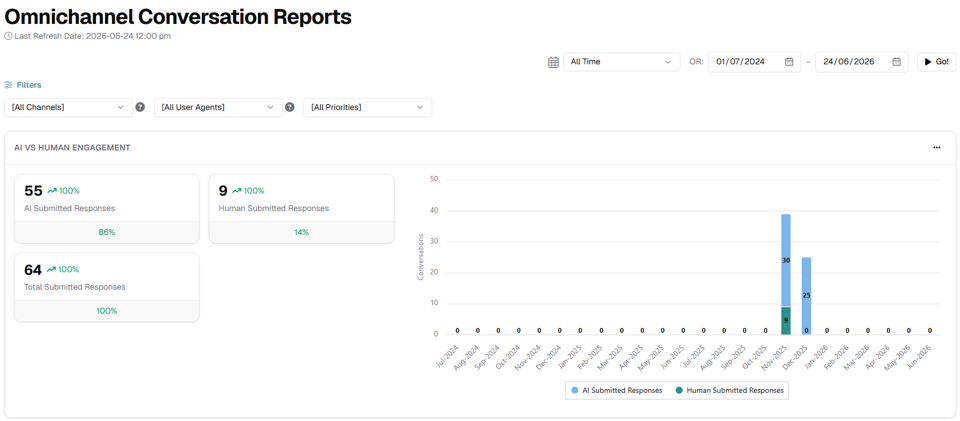
The KPI cards on the left summarize:
- AI Submitted Responses — absolute number of responses delivered by the AI agents, with the percentage variation compared to the previous period.
- Human Submitted Responses — absolute number of responses delivered by human agents and percentage variation.
- Total Submitted Responses — sum of both, with the percentage of the total represented by each source (for example, 86 % AI versus 14 % Human).
The stacked bar chart on the right plots the monthly distribution of AI versus Human responses, making it easy to detect adoption trends and seasonality.
5.3 Tickets by Agent and by Status
Two donut charts that show how conversations are currently distributed:
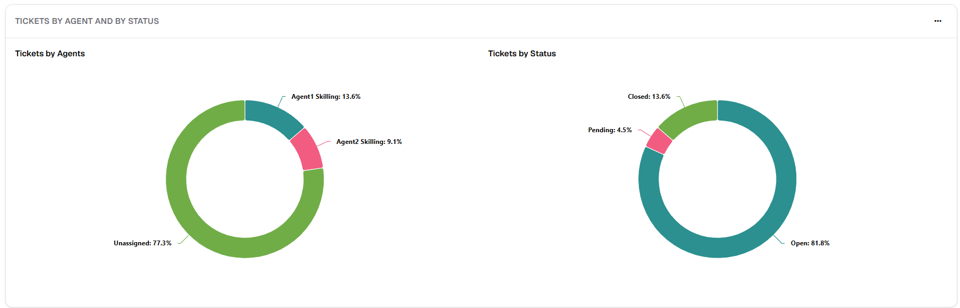
- Tickets by Agents — share of conversations handled by each human agent, plus the share of conversations still unassigned. Use it to balance workloads across the support team.
- Tickets by Status — share of conversations in Open, Pending and Closed status. Use it to monitor the overall health of the queue.
5.4 Tickets by Day and Hour
Two bar charts that explore the temporal distribution of incoming conversations:
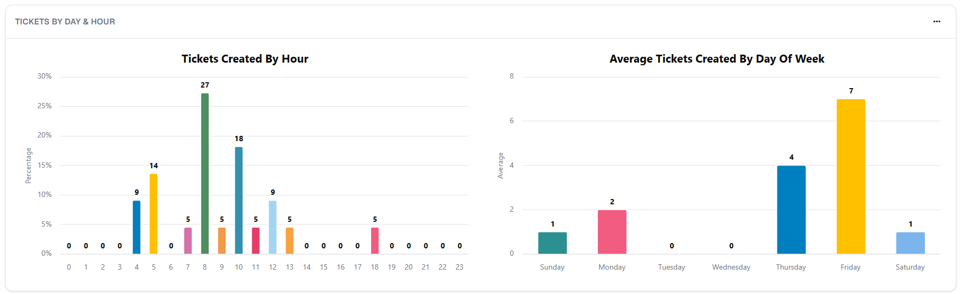
- Tickets Created By Hour — percentage of tickets created in each hour of the day (0 to 23). Use it to identify peak hours and to size on-call rotations.
- Average Tickets Created By Day Of Week — average number of tickets opened each day of the week. Use it to plan staffing for the busiest days.
5.5 Engagement Efficiency
Measures how quickly the team responds to and resolves conversations.
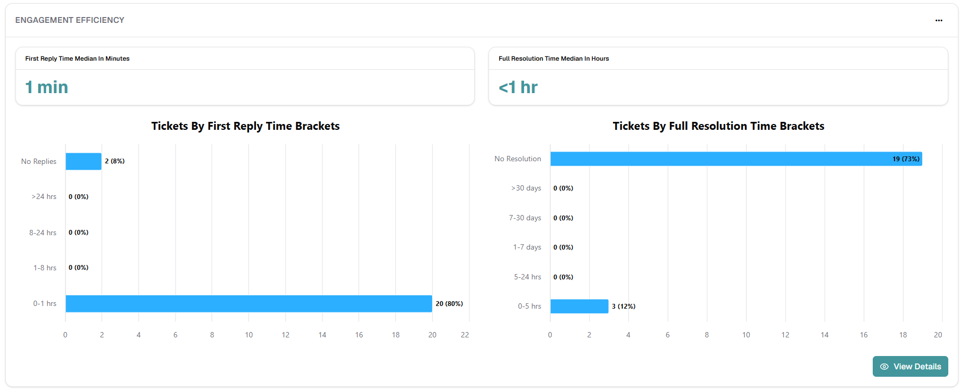
The two KPI cards on the top show:
- First Reply Time Median In Minutes — median time between the first user message and the first agent reply, expressed in minutes.
- Full Resolution Time Median In Hours — median time between the opening and the closing of the conversation, expressed in hours.
Below the KPIs, two horizontal bar charts distribute the conversations across response-time brackets:
- Tickets By First Reply Time Brackets — groups conversations by how fast the first reply was sent (0-1 hrs, 1-8 hrs, 8-24 hrs, > 24 hrs, No Replies).
- Tickets By Full Resolution Time Brackets — groups conversations by how long they took to close (0-5 hrs, 5-24 hrs, 1-7 days, 7-30 days, > 30 days, No Resolution).
Engagement Efficiency Details
Click the View Details button at the bottom right of the report to open the Engagement Efficiency Details modal, which lists every conversation that contributes to the metrics above.
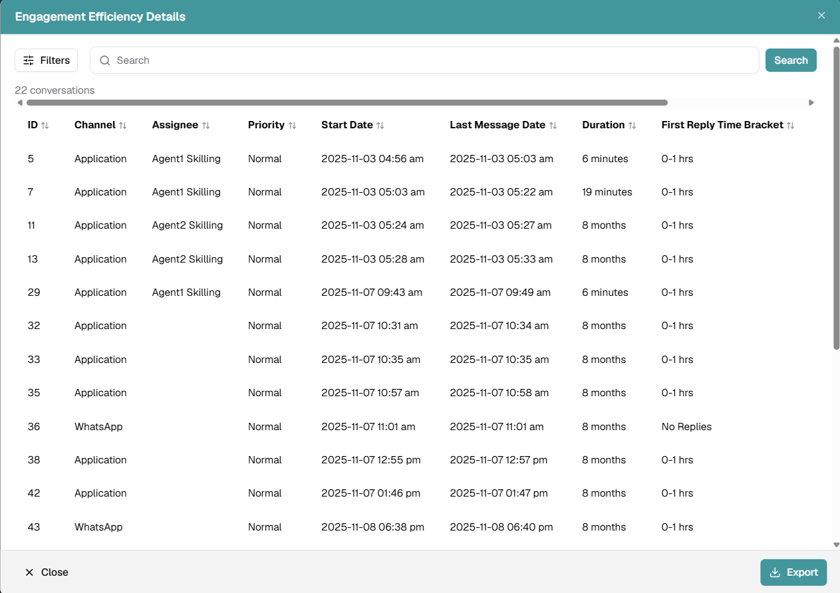
The modal includes Filters and Search controls on the top, a record counter (for example, 22 conversations), and a detailed table with the following columns: ID, Channel, Assignee, Priority, Start Date, Last Message Date, Duration and First Reply Time Bracket. Use the Export button at the bottom right to download the data, respecting the filters currently applied. Close dismisses the modal.
6. Notes and Best Practices
- Configure the Default Email Template and the Agent Signature before going live, so that every reply to email-based channels carries a consistent brand experience.
- Use Moderated Mode for sensitive use cases (compliance, regulated industries) and switch to AI Mode only after confirming that the agent’s answers meet the desired quality criteria.
- Set up Custom Fields for the attributes that matter to your operation (CRM identifier, geography, plan, etc.) and make them visible in the Chat Modal so that agents have full context when responding.
- Review the Tickets by Day and Hour report when planning shifts and on-call rotations, so that staff is available during peak hours.
- Monitor the AI vs Human Engagement report weekly: a sustained increase in human responses may indicate that an agent prompt or its connected libraries need to be refined.
- Export the Engagement Efficiency Details before closing a quarter to keep an offline record of response and resolution times, useful for SLA reviews.